Showing posts with label entree. Show all posts

Tuesday, December 10, 2013

German Burgers w/ Beer Onions


Hey all!  It's been a while since I've blogged but I was really missing it so I'm back with this delicious burger!  

Let me start by saying that my husband LOVES burgers -- I really like them but I could take it or leave it -- in my quest to eat healthy, they sometimes just don't fit into my diet.  But lately we have been taking our burgers to the next level by grinding our own meat.  If you haven't done this yet, you simply MUST!  Grinding your own meat allows you to pick and choose which types of beef you'd like, how lean you like it and you can go ahead and grind in anything with the meat such as onion or...BACON {a personal fav of husband}.  Plus when you grind your own meat, you get this fresh and pure flavor that just cannot be achieved using pre-ground packaged meat from the store.  

We have been testing different combinations of meat for our burgers and last night we used a 50/50 mix of short rib and sirloin.  When choosing a combination, make sure to pick one meat that has a bit of marbling to it {fat} so that you don't end up with dry burgers.  If your meat doesn't have a lot of fat {like if you are grinding  pork loin or chicken} go ahead and grind in a couple strips of bacon.  

So this particular burger was delicious for a few reasons: 1. fresh ground beef, 2. bacon-cheddar cheese, 3. pretzel buns, 4. beer caramelized onions.  My mouth just filled up with saliva reliving this....  Here comes the recipe!


German Burgers w/ Beer Onions (makes 2 gluttonous burgers w/ double patties or 4 burgers for normal human beings)

For Burger Patties:

1/2 lb beef short rib meat, cubed
1/2 lb beef sirloin, cubed
salt and pepper

For Onions:

1 medium sized onion, sliced
olive oil
salt and pepper
dash of worcestershire sauce
1/4 c. of beer 

Assembly and toppings:

2 or 4 pretzel buns {found mine at Trader Joe's}
butter
Shaved Bacon-Cheddar cheese {also Trader Joe's}
lettuce
pickle
deli mustard

1.  Start with the onions by heating up some olive oil in a large skillet over medium high heat.  Add your onions and season with salt and pepper, cook, stirring often, until they begin to caramelize {about 7 to 10 minutes}.  Add worcestershire sauce and beer and stir to combine.  Cook until the liquid is reduced, about 5 more minutes.  Set aside.

2.  Grind your meat!  I used the meat grinder attachment on my Kitchen Aid Stand Mixer -- so happy that I can get EVEN MORE use out of this kitchen appliance.  Season meat with salt and pepper and form into 4 thin patties.  Preheat a cast iron skillet or griddle over medium high heat.  Add a little olive oil to the pan then throw on your burgers.  Cook for about 5 minutes {let them get a nice crust}.  Flip burgers, top with cheese and cover with a lid so the cheese melts.  Remove burger patties to a plate.

3.  Butter those pretzel buns and give them a quick toast on your skillet or griddle now get ready to assemble the burgers: bottom bun, mustard, lettuce, patties {double them if you are really splurging like we did}, beer onions, pickles, top of bun!  Now there's nothing left to do but eat...


Thursday, August 1, 2013

Jalapeno Popper Pizza


Who loves jalapeno poppers?!  I think the better question is.... who doesn't like them?  I just love the crunch of the outside, the spiciness of the jalapeno and of course the creamy center.  Mmmm!  But we all know how I'm not a huge fan of frying and I'm also not a big fan of dumping frozen product on a cookie sheet and throwing things in the oven.  So this pizza was born.....  and let me tell you something....  I'm glad I made a small pizza  because I could have housed the entire thing!  This ain't diet food, people!  The crust is smeared with cream cheese and topped with sharp cheddar and a mixture of fresh and pickled jalapenos.  Then comes the kicker -- a sprinkling of panko bread crumbs for crunch.  Don't skip this step -- everyone who sampled this pizza said the panko made the dish!  

Oh and I couldn't stand the fact that there wasn't any meat on this sucker so I topped it off with bacon.  Oh hell yes.  


Jalapeno Popper Pizza

1 ball of fresh pizza dough
EVOO for drizzling
1 stick of cream cheese, room temperature
2 cups sharp cheddar cheese, shredded
1 small jalapeno, chopped
2 tbsp pickled jalapeno, chopped
4 strips cooked bacon, crumbled
1/4 c. panko 

1.  Preheat oven to 475 with pizza stone in oven.  When pizza stone is hot, remove from oven and drizzle with olive oil.  Stretch dough ball to desired size and shape and lay on pizza stone.  Place pizza stone in oven and bake for 5 to 7 minutes.  Remove from oven.
2.  Spread cream cheese on crust and top with cheddar cheese, jalapenos and bacon.  Place pizza back in oven and bake for 10-15 minutes or until cheese is melted and crust begins to brown.  Remove pizza from oven.  Set oven to "Broil".
3.  Sprinkle panko over top of pizza and place under the broiler for about 3 minutes, or until panko begins to brown.  Remove from oven, cut and serve!

Thursday, July 18, 2013

Grilled Red Chile-Buttermilk Brined Chicken w/ Mango Honey Glaze


Bobby Flay has some amazing recipes up his little sleeve but good Lord are they a lot of work.  This ain't 30 minute meals, people!  In fact, I was mentally prepared to make this for dinner one night -- I went to the store and gathered all the pertinent ingredients and spices, random dried peppers, etc -- when I read the first sentence of the instructions, "Place chicken in fridge for 4 to 24 hours".  DAMN!  I mean I totally had the 4 hours but 24 hours??!!  Of COURSE I have to marinate for 24 hours -- I can't half-ass this!!!  {Yet another example of reading the recipe all the way through before you get your heart set on a meal....however I guess I was just being stupid-pants because the word brine is in the recipe's title.  duh.}  

Well, giving the chicken 24 hours was well worth the wait -- the meat was so juicy and so flavorful -- there really are no words.  

I went ahead and served this delicious chicken over rice simply dressed with arugula and lime juice.  The mango honey glaze gets all gooey over the rice and it all just goes wonderfully together!  Put the time and ingredients into this lovely spin on the boring grilled chicken we are used to this time of year!  Spice things up a bit!

Grilled Red Chile-Buttermilk Brined Chicken w/ Mango Honey Glaze - 4 servings

Chicken:

1 quart buttermilk
2 tbsp ancho chile powder
1 tbsp new mexican chile powder
1 tbsp cascabel chile powder
1/2 tsp cayenne pepper
1 tsp smoked paprika
1 tsp ground coriander
1 tsp granulated garlic
1 tsp onion powder
1/2 tsp ground cinnamon
4 (8oz) skin on chicken breasts
4 chicken drumsticks
salt and pepper

Glaze:

2 tbsp canola oil
1 small spanish onion, chopped
1 clove garlic, chopped
3 large ripe mangos, peeled and chopped
1/2 c. dry white wine
1/4 c. pineapple juice
1/4 c. fresh orange juice
1/4-1/2 tsp cayenne pepper
3 tbsp honey
salt and pepper

1.  For chicken:  combine buttermilk and all spices.  Add chicken and turn to coat.  Place chicken in fridge for 4 to 24 hours, turning a few times.
2.  Remove chicken from brine and pat dry with paper towels.  Put chicken on a baking rack set over a baking sheet.  Return to fridge, uncovered for 1 to 4 hours.  
3.  For glaze:  heat oil in saute pan over medium high.  Add onion and cook until soft, 4 minutes.  Add garlic and cook 1 minute.  Add mangoes and cook until broken down and caramelized, 10 minutes.  Add white wine and cook until reduced by half, about 2 minutes.  
4.  Transfer glaze to blender; add pineapple juice, orange juice, and cayenne pepper.  Blend until smooth and strain into a small bowl and season with honey, salt and pepper.  Mixture should be a thick puree, thin with water if  necessary.  Cool to room temperature.
5.  Prepare grill to medium high heat.  Brush chicken with oil and season with salt and pepper.  Grill skin side down for 4 to 5 minutes.  Decrease heat to medium, close grill and cook 15 to 20 minutes.  During the last few minutes, brush chicken with some of glaze.  
6.  Remove chicken from grill to a platter with more glaze.  Let rest 10 minutes before serving.


Wednesday, July 17, 2013

Fried Green Tomato Caprese Salad


I have been on a major vacay....  so sorry to anyone who has wondered where the heck we have been for about a month!  I wish I was coming back to the blog with piles of pictures and tales of great travels, but sadly, no.... I didn't have an actual vacation; life just got a little cray up in here with visitors and animals and new jobs and more new jobs ... my little hobby had to take the back seat for a while!

But I'm back and I've got something ridiculous for you all today.  I know, I know, it's summer -- we're all trying our best to get outside and workout, eat healthy and keep that bikini body in tip top shape, while still consuming as much alcohol as possible.  This post is where SkinnyChow goes to die.  I can't help but think of my girlfriend who just started a 30 day cleanse.... I don't want to rub it in or anything but you are seriously missing out on this monstrosity!  ;)

So who doesn't love the classic Italian Caprese Salad?  Yummy vine-ripened tomatoes layered with fresh and velvety mozzarella and topped with a sprinkle of home-grown basil....drizzle with your finest olive oil and balsamic vinegar and you have a great starter to any meal....  


So I decided to destroy this delicate salad and fry it...
...in true Southern fashion

In all seriousness -- this salad eats like a meal.  In fact, just eat it as a meal.  Trust me.  Oh and also trust me when I tell you to drizzle this baby with balsamic syrup and peach jam (homemade jam if you can swing it!).  It really takes the dish to the next level with the lovely combination of salty and sweet.  Oh and as I'm typing this, I realize that I could have made this salad even better with the addition of bacon....  but there's always next time...


Fried Green Tomato Caprese Salad (makes 4 salads)

Fried Green Tomatoes:

4 large green tomatoes, sliced into 4 (1/2 inch) slices each
2 eggs
1/2 c. buttermilk
1 c. all purpose flour
1/2 c. cornmeal
1/2 c. breadcrumbs
2 tsp salt
1/4 tsp ground black pepper
vegetable oil for frying

Whisk egg and buttermilk together in a medium sized bowl.  Scoop flour onto a plate and mix cornmeal, breadcrumbs and salt and pepper on another plate.  Dip tomatoes into flour to coat.  Then dip the tomatoes into milk and egg mixture.  Dredge in breadcrumbs to completely coat.
In large skillet, pour vegetable oil {1/2 inch of oil in the pan} and heat over medium heat.  Place tomatoes into the frying pan in batches, being careful not to crowd the pan.  When tomatoes are browned, flip and fry the other side.  Drain on paper towels.

Salad and Assembly:

2 large balls fresh mozzarella, each cut into 6 slices
12 fresh basil leaves, plus more for garnish if desired
peach jam
balsamic syrup

To assemble salads, place one fried green tomato on each plate.  Top each tomato with one slice of mozzarella followed by one basil leaf.  Repeat this process ending with a fried green tomato, until each plate has 4 tomato slices and 3 mozzarella slices.  Garnish top of stack with basil.  Place peach jam in a small microwave safe bowl and microwave on high for 20 seconds.
Drizzle each salad with peach jam then drizzle with balsamic syrup.  Enjoy immediately.


Tuesday, May 28, 2013

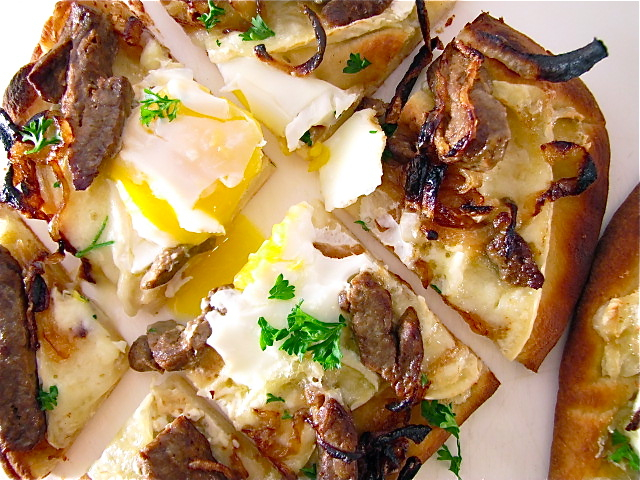
Steak & Egg Flatbread with Creamy Brie and Caramelized Onions


Breakfast for dinner -- one of my favorite things!  As if this pizza-like dinner can't be made any better, we throw a runny egg on top!  Pure perfection.  This flatbread was made one of those nights were I had no idea what to do for dinner and was feeling particularly lazy.  I opened the fridge and saw some odds and ends...leftover steak from dinner last night, half a wheel of brie from a cheese plate a few days ago, and of course my staple go-to dinner every night after work: eggs. So I threw all these things together and enjoyed!  Feel free to mix up the ingredients and use up any leftovers you have.  Any cheese would be stellar on this flatbread but I chose the brie due to it's melty-ness -- this flatbread lacks a true sauce so the brie mixed with the runny egg kind of makes up for that.  My husband announced after his first bite that we needed a sauce so I gave our dinners a drizzle of balsamic syrup and it was delicious!

Steak & Egg Flatbread w/ Creamy Brie and Caramelized Onions (makes 2 flatbreads)

1 package (2 flatbreads) naan
leftover steak, london broil, etc, thinly sliced
1/2 wheel of brie, sliced, with rind
one large onion, caramelized 
salt and pepper 
2 large eggs
handful parsley, chopped
Balsamic syrup, if desired

1.  Preheat oven to 475.  Place a pizza stone in oven on a middle rack while preheating.  When oven is heated, place each flatbread on the pizza stone and bake until just starting to crisp, 5 to 7 minutes.  Remove flatbreads from oven, leaving the pizza stone.
2.  Top each flatbread with steak, brie and caramelized onions.  Try to arrange the toppings in a circular pattern around the outside of the flatbread, leaving space in the center of the flatbread for the egg. Season with salt and pepper
3.  Carefully crack one egg on each flatbread and place flatbreads in the oven back on the pizza stone.  Bake 5 minutes then switch the oven to broil.  This will allow the whites of the egg to set before the whole flatbread is burned.  Broil flatbreads until cheese is bubbly and egg whites are set.  Remove from oven and sprinkle with parsley.  Drizzle with balsamic syrup if desired.

Tuesday, May 14, 2013

French Bistro Burgers


Who doesn't love a perfect burger?  I believe that the most important part of a burger is the bun and I'm constantly on the search for the perfect hamburger bun.  Honestly, I've thought of baking them myself but let's not kid ourselves....I might be getting a little better in the baking department but when it comes to baking bread...that is a completely different beast.  No.  So on I went looking for an airy bun that is burger-worthy. The grocery stores  just don't have the good stuff....I was about to start checking small bakeries when I hit the jackpot.  My husband and I were eating lunch at Fuddruckers' and I looked up and realized, "OMG, they sell their buns!!!!!!!!!!!!!!!!!!!!!!!!"  So there you have it.  Perfect burger buns for your home grilling!  And at 3 bucks for a half-dozen, you're getting a better deal than most grocery stores!  I am one happy girl!  

The next step in a great burger is to use a grill press like this one.  And I know the comments will flow out like, "oh, these press all those delicious juices out of the burger and you end up with a dried out hockey puck". Not so.  We used our grill press last night and trust me on this -- we still had juicy burgers and we also had burgers that fit on our buns and didn't shrink up on the grill -- I hate that!

Ok so here's the deal with this burger -- it's pretty much the best burger we've ever made in this house -- and we've made a lot of burgers.  I actually attribute most of its deliciousness to the bun but hey I'll throw myself a bone on the toppings as they were amazing.  If you're not a fan of brie then go ahead and use any cheese you prefer -- but the burger will no longer be "French". Sorry.   Bon Appetit!

French Bistro Burgers (makes 4)

4 hamburger buns, split
4 tbsp butter
1 1/2 lbs ground sirloin
1 large onion thinly sliced
extra virgin olive oil
salt and pepper
8 slices bacon, cooked
1 small wheel of brie, sliced 
4 lettuce leaves

1.  Form patties by seasoning sirloin with salt and pepper and dividing the beef into 4 patties.  Set aside until ready to grill.
2.  Caramelize onions:  In a large pan over low heat, add a drizzle of olive oil and add onions, salt and pepper to taste.  Cook onions over low heat for about 45 minutes, stirring occasionally, until onions are cooked through and caramelized.  Set aside.
3.  Grill burgers until desired done-ness (medium-well is preferred).  Butter each hamburger bun and place on grill until toasted.
4.  Assemble burgers:  place lettuce leaf on bottom half of bun.  Top with burger, sliced brie, bacon and onions.  Top with bun and take it to the mouth!

Tuesday, May 7, 2013

Cashew Chicken Pizza


I love a good pizza adventure....something a little unusual to spice up my day.  I recently came up with this doozie -- I love the combo of the crunchy crust along with the spicy sauce, chicken and nutty cashews.  YUM!  What I love so much about pizza is this:  you really can never mess it up!  No matter what, you always come out with something that is edible, if not amazing.  Use some creativity and really take your pizzas to the next level -- throw everything but the kitchen sink on there and dig in!  

{And just an FYI -- I haven't mastered the perfect crust so I just use a fresh ball of pizza dough from a pizza parlor or grocery store.  I always heat up my pizza stone in the oven first then stretch the dough out and bake it for a few minutes before adding any toppings - this prevents the dough from not cooking all the way through and allows for a truly crispy crust!}

Cashew Chicken Pizza 

1 (1 lb) ball of fresh pizza dough
Extra virgin olive oil, for drizzling
1 chicken breast, cooked and sliced
1 small jar hoisin sauce
1 lb mozzarella cheese
3 tbsp light sour cream
1 small red onion, thinly sliced
1 small green bell pepper, thinly sliced
1 handful cilantro, chopped
1 handful cashews, roughly chopped
sriracha sauce, to taste

1. Preheat oven to 450.  Place pizza stone in oven until hot, at least 15 minutes.  Remove pizza stone from oven and drizzle with olive oil.  Stretch pizza dough out onto pizza stone and place back in oven until just beginning to brown, around 7 minutes.  
2. Meanwhile, combine 3 tbsp hoisin sauce with light sour cream.
3. Remove pizza crust from oven and top with remaining hoisin sauce, spreading evenly.  Top with mozzarella cheese, onion, bell pepper, chicken, cilantro and cashews.  Return pizza to oven and bake until crust is browned and cheese is melted, around 10 minutes.
4.  Remove from oven and drizzle with sour cream sauce and sriracha sauce.  Serve immediately.

Monday, November 19, 2012

{SkinnyChow} Grilled Shrimp Caesar Salad


This week is one of my favorite weeks of the year....

Most people have a nice, short work week....

And I spend the whole week planning the most important meal of the year -- and then I get to cook it!  Woo hoo! 

I just love the excitement of Thanksgiving because it kicks off the holiday season.  I don’t know how it happens but every year I plop down to watch the Macy’s Day Parade and I literally burst into tears when the Rockettes do their thing.  In fact, my eyes are watering just typing this.  LOL.  So yes, I’m a little dramatic, but I just LOVE this week.

So how about we start the week out with a little SkinnyChow -- save up some calories for the big feast!

So this salad is extra special because the romaine lettuce is grilled!  If you haven’t tried grilled lettuce you’ve gotta get on it asap.  It takes your salad to the next level, adding some smoky charred action and slightly wilting the leaves.  Also, the creamy caesar dressing is super satisfying and is made with fat free greek yogurt.  {I just LOVE that stuff!}  Feel free to substitute any protein in this salad -- chicken, beef and salmon would be fantastic.  

SkinnyChow Grilled Shrimp Caesar Salad (makes 4 salads)

For Salad:
24 large raw shrimp, deveined, tails on
salt and fresh ground black pepper
2 hearts of romaine, split in half
cooking spray
fresh grated parmesan cheese
1 lemon, cut into 4 quarters

SkinnyChow Creamy Caesar Dressing:
1/2 c. plain fat free greek yogurt
2 tbsp fresh lemon juice
2 to 3 tbsp skim milk {or more depending on how thin you like your dressing}
grated zest of 1 small lemon
1 large clove garlic, grated
1/4-1/2 tsp anchovy paste {optional -- but it really kicks this dressing up a notch}
salt and pepper to taste

  1. Combine all ingredients for dressing in a mason jar, or jar with a lid and shake up.  Refrigerate until ready to use.
  2. Heat a grill pan over medium heat.  Toss shrimp with salt and pepper and spray grill pan with cooking spray.  Cook shrimp on grill pan 1 to 2 minutes per side, or until shrimp turn pink.  Remove shrimp from heat into bowl and set aside.
  3. Spray each romaine heart half with cooking spray and place cut side down on grill pan.  Grill until charred then remove each romaine heart to serving plates.  Top romaine with 6 shrimp each, sprinkle with parmesan cheese, salt and pepper, and squeeze lemon juice over each salad.
  4. Drizzle each salad with caesar dressing and serve with crusty bread if desired.  

Tuesday, October 30, 2012

Spaghetti with Peas and Pancetta


Tyler Florence is one of my favorite chefs, in fact, his cookbook, Tyler Florence’s Real Kitchen, was one of the first books I bought that made me think... “Holy cow...I love food in a crazy way, and I love to make it look beautiful, and I love to cook for anyone that will sit down at my table.”   This epiphany came while pouring over the pages for hours, staring at the photos and, also, I had a little crush on him {it was 2003 -- don’t tell my husband}.  Anyhow, if you guys haven’t discovered Tyler Florence, check his books out.  His mantra is all about taking the ingredients that you have and making them glorious in a simple, unfussy way.  There’s even a sushi section in the book, which led me to try out sushi at home for the first time....something that is truly scary for any cook.

Another thing I especially love about this book is his section of recipes specifically designed for 2 people... Steve can be a little picky when it comes to leftovers {um, and I also like to cook so much that a new day calls for new food, don’t you think??} so we are constantly letting food go to waste.  A recipe for two is perfect simple.  Today I’m showing you a pasta recipe from his book that I love so much, filled with peas, pancetta, goat cheese and lemon.  I hope you guys love this easy to make recipe as much as I do...it’s become a staple in our home!

Spaghetti with Peas and Pancetta
from Tyler Florence’s Real Kitchen

1/2 pound spaghetti
extra virgin olive oil
6 oz pancetta or thick cut bacon, diced
1 onion, minced
1 bay leaf
1 c. sweet peas, frozen or fresh
1 oz goat cheese
1/2 c. fresh grated parmigiano-regiano
1/4 c. fresh flat leaf parsley
juice of 1 lemon
fresh ground black pepper
1/4 c. fresh basil, hand torn

  1. In a large stockpot, cook spaghetti in plenty of boiling salted water for about 10 minutes, pasta should still be a little firm.
  2. At the same time, heat a 2-count drizzle of olive oil in a large skillet over medium-low heat.  Add the pancetta or bacon and stir.  When fat starts to render, after about 3 minutes, add the onion and bay leaf.  Cook and stir until the onion caramelizes, about 10 minutes.  Now add the peas and cook for 2 minutes just to heat them through.
  3. Drain the pasta, reserving 1 cup of the starchy water for the sauce.  Ford the goat cheese into the hot pasta and give it a toss so it melts.  Scrape the pancetta {bacon}, onions and peas into the pasta pot {toss out the bay leaf}.  Add the parmigiano, parsley and lemon juice.  Slowly pour in the reserved pasta water to dissolve the cheese and thin it out to a sauce consistency.  Hit it with a healthy dose of olive oil and a few turns of fresh ground black pepper to give it bite.  Return noodles to the pot and gently toss to coat in the sauce.  Split the pasta between two large bowls and shower it with shredded basil.

Thursday, October 4, 2012

Oktoberfest & Schnitzel

The main entrance to Oktoberfest


Oktoberfest may have been the last stop on our trip to Europe, but it was definitely my favorite.  I found that Munich reminded me a lot of a typical American city, bustling with people, big buildings, corner restaurants and taxi cabs.  It was a comforting feeling of familiarity when I was starting to feel slightly homesick.

The Oktoberfest is simply amazing -- a must-see for anyone who likes to party, have fun, sing songs, drink beer, people watch and eat pretzels the size of your head.  The carnival outside the tents is packed with street food {schnitzel sandwiches, brats, gingerbread cookie hearts covered in German/Bavarian sayings and worn as a necklace}, rides and games.  The beer is carted in on horse-drawn carriages and the beer tents are where the real party happens.  They are packed with tables where guests sit and are served liter beers and food while meeting new table-mates and singing German drinking songs played by the band.  Each tent is named for the type of beer that they serve. 
Bringing in the Beer!

As the day goes on, the crowd gets quite lively.  They move from sitting down to standing on their seats, to dancing on their seats, then dancing on the tables themselves.  All of this is encouraged. {And by the way....I was nervous to enter the bathrooms at a party of this magnitude but I went in all day and night to find them spotless and fully stocked with TP at all times! }
Amazing panoramic of the Spaten tent 


Now to the food!  The night before the ‘fest, we ate at a German restaurant that my husband deemed “the best meal he ate on vacation”.  Pork Wiener Schnitzel with German Potato and Cucumber Salad.  Amazing.  Usual schnitzel recipes call for simple ingredients of pork with a breading of egg and plain bread crumbs, fried and served with lemon....but this was a special breed of schnitzel...juicy pork with a tang of mustard and horseradish.  I knew it would be the first meal I replicated at home.  The potato-cucumber salad was fantastic; creamy, yet vinegary.  The cucumbers add a lovely crunch and brightness to the dish!  Serve these recipes up with some good cold beers and you’ll be feeling like a German in no time!


Wiener Schnitzel

Marinade:
1/3 c. cider vinegar
3 tbsp grainy dijon mustard
1 heaping tbsp prepared horseradish

4 pork cutlets or chops, pounded to 1/4 inch thickness
1/4 c. flour
1/4 tsp salt
1/2 c. bread crumbs
2 eggs
vegetable oil for frying

  1. Combine marinade ingredients in a large ziplock bag and add pork to bag.  Place in refrigerator and marinate 2 hours.
  2. Set up three shallow dishes.  Place the flour and 1/2 tsp salt in one and breadcrumbs in another.  Beat eggs well and place in a third dish.
  3. Heat at least 1/4 inch of oil in a frying pan to 350 degrees.
  4. Working one at a time, dredge cutlets first in flour until surface is completely dry.  Dip in egg to coat, allow excess to drip off then quickly roll in breadcrumbs until coated.  Place meat immediately in pan with hot oil.  Do not crowd pan.  Cook in batches if necessary.
  5. Fry the schnitzel for 3 to 4 minutes on one side.  Turn them over once and fry until both sides are golden brown.  Remove from pan and place on plate with lemon slices. 

German Potato-Cucumber Salad

2 lb. Yukon gold potatoes
1/2 c. chopped fresh parsley
1 small white onion, chopped
1 English cucumber, seeded, halved and sliced
1/4 c. tarragon vinegar
1/4 c. vegetable oil
1/2 c. chicken broth
1 to 2 tsp sugar
salt and pepper to taste

1.  Boil potatoes until soft but firm.  Cool them in an ice bath.  Once cooled, cut the potatoes into bite-sized pieces.  Add parsley, onion, cucumber, vinegar and oil.  Mix well.  Stir in chicken broth.  If more broth is needed to moisten, add up to 1/2 cup.  Add 1 tsp sugar, salt and pepper.  Taste and add more sugar, if desired.


©ChowGals - Designed by BDD